Tag Archives: wood working

Panama canal

Panama canal puzzle

This is an old sliding puzzle. A simple puzzle to make but fun to play. You start with,
CANAMA
PANAL     empty square at bottom right
And you try to make,
PANAMA
CANAL  by sliding puzzle pieces. The solution of this puzzle require minimum 21 moves. I cut puzzle pieces from 30 x 10 mm ready stock. Each puzzle piece is 30x30x10 mm. For making the try, I used 10×10 mm ready stock and 10 mm plywood. If you round corners a little and chamfer all edges, pieces will slide better. For sliding puzzles, ı advise making the try 2-3 mm bigger than total pieces dimensions. If you want play and test before making this one, you can play online here.


Big wafers

Big wafers

This puzzle is similar to “Small wafers”. This puzzle has 7 pieces and you must make an 8×8 square. Material thickness is 8 mm and each square is 15 mm. Puzzle pieces are here.

Big wafers puzzle pieces

You can make all pieces by cutting two wooden 2a and 3a wooden strip. I hope you like them.

Small wafers

Small wafers puzzle

After very long time, yesterday I returned back to my workshop for making my two new puzzle design. This puzzle has six pieces. The aim of this puzzle is making a 7×7 square. Puzzle pieces are here,

small wafers puzzle pieces

Making this puzzle is easy. Because all parts has only two different width. You can set your table saw two time and cut  2a and 3a wooden strips. After you can cut all parts from this two strips. I cut all pieces with my hand miter saw. Puzzle pieces are small and cutting them with power tools is dangerous if you haven’t special fixtures. I made this two puzzle (with big wafers) in 4 hours. Material thickness isn’t critical. I used 8 mm thick wood. For my puzzles each square dimension is 15 mm. Choosing thickness approximately as half of square dimension make looks better this puzzle. I used mahogany. Looks like chocolate. I like making saw traces on puzzle pieces. I make nearly saw traces to all my puzzle pieces. I make saw traces with my hand miter saw. I set cutting depth to 1 mm. You can make also with a small hand saw. Making saw traces take time. But puzzle pieces with saw traces looks nice. I make also chamfer to all edges with a sanding block. For this puzzle you can make also saw traces only upper side of each piece.

Saw traces for puzzle piecesI prefer mostly oil finish. A lot of people prefer varnish or lacquer. You can find comparisons for different finish methods on woodworker web sites. An easy to solve puzzle but in same time very easy to make.

Cubes and planks

Cubes and planks

I designed and made this puzzle long time ago. For designing this puzzle I am inspired from “Stars and stripes” puzzle designed by Wolfgang Schneider. Thanks from here for his beautiful and original design.

This puzzle has nine pieces. I like this puzzle, because it looks nice and different. The solution isn’t very difficult but force you to think about assembly. This puzzle isn’t a beginner project, because it’s require a precise work. For my puzzle, cube dimensions are 20x20x20 mm. Planks are 20x10x80 mm. You can cut planks 0.2 or 0.3 mm longer according to your working precision. You will need 20 cube and 18 plank. The center of the puzzle and the center of each face is empty. Puzzle pieces are here,

cubes and planks puzzle pieces

After preparing your cubes and stripes, assembly also require precision. Before fixing cubes to the planks, you must be sure that a plank can enter between two cube. And the two plank of each piece must be perfectly perpendicular. You can make a simple gluing jig from your scrap woods or you can use a small machinist square. You can make also this puzzle with 3D printing like almost everything. 🙂  You can download or preview free PDF file including solution from here. (0.4 MB on secure server box.com)

Spot dice

Spot dice puzzle

This puzzle is from the book “Puzzles old and new” of professor Hoffmann. A very easy puzzle to make. You can make this puzzle in a few hours. For making this puzzle I used 20×20 mm beech ready stock. I cut them with my hand miter saw and I drilled some holes. For spots I inserted metal ornaments used in fabric industry. You can find your own solution. You can make also spots by wood burning or painting. Puzzle parts are here,

Spot dice puzzle parts

You can make two type dice with this puzzle,

Dice problems1

You can find the solution of this puzzle here.

This puzzle has also an other variation.

Spot dice 2

You can make two type of dice with this parts.

Dice problems 2
An easy to make and funny to play. I hope you like them.

Get this goat

Get his goat

For designing this sliding puzzle, I am inspired from well-known classic “Get my goat puzzle” . As you can see from photo, the piece with goat illustration is different from “Get my goat puzzle”. Photo show start position ( After putting removed two piece into the box). At the beginning the goat is outside of the fence. The aim of this puzzle is to put the goat into the fence. The solution also is different an a little tricky. At first look you will see the solution as impossible. But there is a small trick. You can guess the solution according the photo.

Tips for making your own puzzle:
1 – For making this puzzle I used 30×10 mm ready beech stock. Box frame is made from 10×10 mm ready stock. And the base is made of 6 mm plywood.
2 – As you can see from photo I used small and thin magnets for auto positioning pieces. But I don’t advise to use magnets for sliding puzzles. They stick more than I was expected and make difficult to move pieces.
3- Making the box 2-3 mm bigger than total dimension of pieces is advised for all wooden puzzles because wood change dimension according weather conditions.

Offroad cube

Offroad cube puzzle

This puzzle is one my simple 4x4x4 cube design.I think my inspiration source for puzzle name is clear. I was bought some Chinese puzzles for bargain. I made a lot of puzzle from them. I will share them later. I made this puzzles from ready pieces. Not a collector piece but enough good to play. Puzzle pieces are here,

Offroad cube parts


As you can see from picture, most of the parts can be made easily by gluing two tetramino piece or by adding a few blocks or cubes to them. External dimensions of this puzzle is 60x60x60 mm.Each cube is 15x15x15 mm. Here I will give the solution for this puzzle. According to my opinion playing with a puzzle without a solution is better, but for making them a solution is useful.

offroad cube solution

Diabolical cube

Diabolical cube puzzle

This simple 3x3x3 cube described first in the book “Puzzles Old and New” by Professor Hoffmann  published in 1893. This puzzle has an historical importance because It’s accepted as oldest puzzle of this type.  All the parts of this puzzle is planar. For this reason a very easy puzzle to make. For beginner to puzzle craft this puzzle may be a good start point. The only part that require a little care is seen on the photo. The center of this this “C” shaped part must have enough clearance so other parts can enter here. If you don’t have a workshop you can make this puzzles by gluing school cubes together. Puzzle parts are here,

Diabolical cube parts

This solution of this puzzle isn’t very difficult. You can find easily after making your cube. You can make also some 2D shapes with this parts for kids.

Torii gate puzzles

Torii gate Osaka

Tori osaka low

Tori gates are Japanese gates. Tori gate puzzles are my home made three puzzle set. This puzzles are well known public domain puzzles. I made them as a coffee table puzzle with a different look. The wooden base for all this puzzles is same.

Part list
For top piece:              20 x 20 x 130 mm                     1 pcs
Top ornaments           20 x 20 x 10 mm                       2 pcs
For base                       20 x 20 x 125 mm                     1 pcs
Pillars                           10 mm diameter x 120 mm     2 pcs

You can take all dimensions from scaled drawing. None of the dimensions is critical. I made all ornaments with my miter saw and with a small hand saw.

This puzzle is well known “African Ball puzzle”. The aim of this puzzle is moving one of the wooden ball to the other ball side. Rope arrangement is visible from photo. Rope thickness is about 3 mm. I advise a rigid (non elastic) rope. You can find the solution easily on internet if you make a Google search for African ball puzzle solution

Torii gate Tokyo

Tori tokyo low

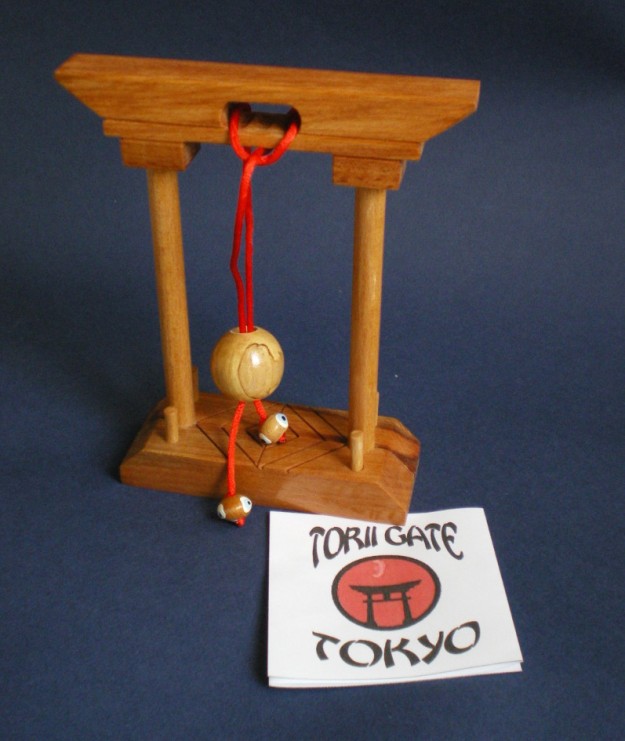
This is also a well known and simple puzzle. If you are familiar with string puzzles you can see the solution from photo. The aim of this puzzle is to free the rope and wooden ball. But looks nice on coffee tables. Small beads at the end of ropes are fixed by gluing them.

Torii gate Kyoto

Torii gate Kyoto puzzle

The aim of this puzzle is taking both dark (small) ball to same side. Rope arrangement is visible from photo. After understanding the solution of African ball puzzle, you can solve this one easily. Two ends of the rope are fixed to the big yellow ball by gluing them.

If you want make your own Torii gate puzzles, you can download or preview this free PDF file including drawing for dimensions from here. (0.3 MB on secure server box.com)  You can print last page without scaling and take dimensions by measuring with a ruler. None of the dimensions is critical.

Vanishing trunk

Vanishing trunk puzzle

This puzzle consist of four pentomino pieces and a tetramino “L”. You can read more about this puzzle and you can see the beautiful original craft example of this puzzle from this article “What’s new in Polyomino Puzzles and Their Design” written by Stewart Coffin and Jerry Slocum.

Vanishing trunk partsThe original of this puzzle has a two sided tray. I saw on internet some commercial productions also made with a two sided tray. I am a lazy craftsman and for this reason making a two sided tray was too much work for me. When I decided to make this puzzle, the origial shape of this puzzle inspired me a house shape. Instead of making a two sided tray, I made a simple chimney. The aim of this puzzle removing the small cube from the chimney and putting it into the house.

Before long years ago, people was using stoves for heating their houses. When the spring arrive, people was dismounting that stoves and putting them to the basement. This design theme fits to this old tradition. I made puzzle pieces from 20×20 mm ready stock. I advise making the box approx. 2-3 mm bigger than pieces total dimensions. As you can see from photo, roof angle is 45°. I made the box frame from 20×10 mm ready stock. The base of the box is 3 mm plywood. Small cube on the chimney is a 20×20 mm block. The hole is 6 mm.

Thanks to Mr.Stewart Coffin from here for this nice puzzle design. To the base of the box two 20x20x30 mm pine (yellow) block fixed.